A lactose-free diet excludes foods containing lactose‚ a sugar found in milk‚ benefiting those with intolerance or sensitivity. It offers a healthier‚ digestion-friendly alternative‚ promoting overall well-being and balanced nutrition.
1.1. Definition and Importance
A lactose-free diet is a dietary plan that excludes foods containing lactose‚ a sugar naturally present in milk and dairy products. This diet is essential for individuals diagnosed with lactose intolerance‚ a condition where the body lacks the enzyme lactase‚ necessary for breaking down lactose. Without proper digestion‚ consuming lactose can lead to uncomfortable symptoms such as bloating‚ gas‚ and diarrhea. The importance of a lactose-free diet lies in its ability to alleviate these symptoms‚ improving overall digestion and quality of life. It also promotes better nutritional absorption‚ as individuals can still obtain essential nutrients from alternative‚ lactose-free sources. Additionally‚ a well-planned lactose-free diet can be rich in variety‚ ensuring that individuals do not feel deprived of flavorful and nutritious meals. This dietary approach is not only a medical necessity for some but also a lifestyle choice for those seeking to avoid dairy products for personal or ethical reasons.
1.2. Benefits of a Lactose-Free Diet
A lactose-free diet offers numerous benefits‚ primarily for individuals with lactose intolerance or sensitivity. By eliminating lactose-containing foods‚ it alleviates symptoms such as bloating‚ gas‚ and diarrhea‚ significantly improving digestion and overall comfort. This dietary approach also encourages the consumption of nutrient-rich‚ plant-based alternatives‚ which can enhance nutritional intake. Many lactose-free foods are naturally low in calories and saturated fats‚ making them a beneficial choice for weight management. Additionally‚ a lactose-free diet promotes the exploration of diverse‚ flavorful meals‚ ensuring that individuals do not compromise on taste or variety. For those with dairy allergies or intolerances‚ adopting this diet is crucial for maintaining optimal health and preventing potential complications. Furthermore‚ it supports ethical and environmental preferences by reducing reliance on dairy products. Overall‚ a lactose-free diet is a practical and healthy choice for many‚ offering both medical and lifestyle advantages.
1.3. Common Misconceptions
Several misconceptions surround lactose-free diets‚ often leading to confusion. One misconception is that lactose-free diets are only for those with lactose intolerance‚ when in fact‚ others may benefit for various reasons. Many believe that lactose-free products lack essential nutrients like calcium‚ but fortified alternatives can provide these. Some think a lactose-free diet is overly restrictive‚ but with the variety of available substitutes‚ it can be diverse and flavorful. Another misconception is that all dairy-free products are lactose-free‚ which is not true‚ as some may still contain traces of lactose. Additionally‚ people often assume that lactose intolerance is a lifelong condition‚ but some can reintroduce dairy gradually. It’s important to clarify these myths to ensure informed dietary choices. Understanding the facts helps individuals adopt a lactose-free diet more effectively‚ without unnecessary limitations or misunderstandings. These misconceptions highlight the need for accurate information to guide those considering or following this dietary path.
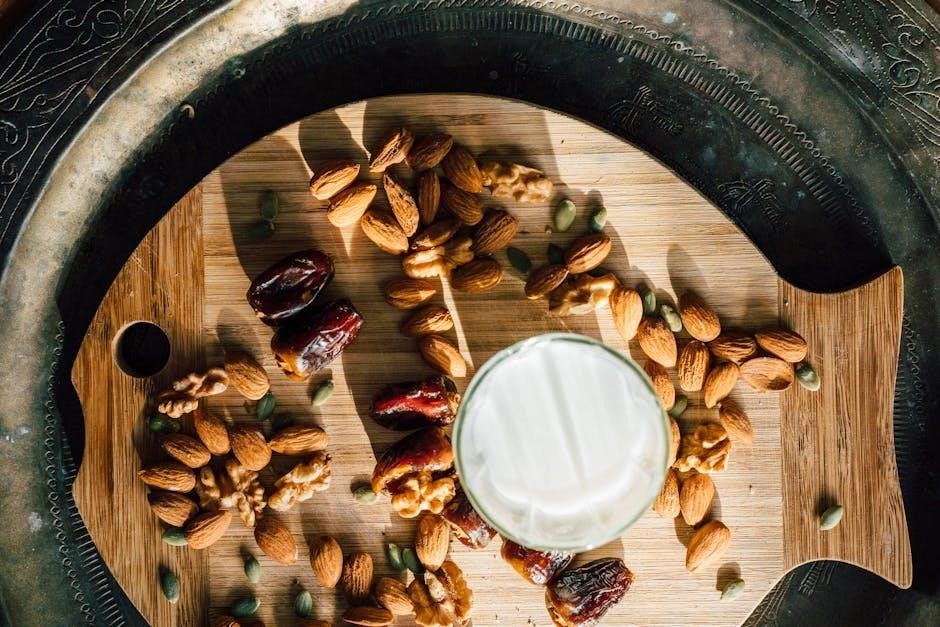
Lactose-Free Food Categories
Lactose-free diets include a variety of food categories such as dairy alternatives‚ fresh fruits‚ vegetables‚ proteins‚ grains‚ snacks‚ and beverages‚ ensuring a diverse and nutritious dietary plan.
Dairy alternatives are a cornerstone of lactose-free diets‚ offering numerous options to replace traditional dairy products. These include plant-based milks like almond‚ soy‚ oat‚ and coconut milk‚ which are naturally lactose-free. Additionally‚ there are lactose-free versions of cheese‚ yogurt‚ and ice cream‚ made by removing lactose through enzymatic processes or using lactase enzymes. These alternatives are rich in essential nutrients such as calcium‚ vitamins‚ and proteins‚ ensuring that those avoiding lactose do not miss out on dietary essentials. Moreover‚ many brands now offer fortified products‚ enhancing their nutritional profiles. Dairy alternatives are versatile‚ suitable for cooking‚ baking‚ and everyday consumption‚ making them a convenient choice for individuals transitioning to a lactose-free lifestyle. They cater to diverse tastes and dietary preferences‚ including vegan and gluten-free options‚ ensuring a wide range of choices for everyone. Fresh fruits are an excellent addition to a lactose-free diet‚ offering a wide variety of flavors and nutritional benefits. They are naturally free from lactose‚ making them an ideal choice for those with intolerance or sensitivity. Berries‚ citrus fruits‚ apples‚ and tropical options like mangoes and papayas are all great lactose-free choices. Fresh fruits are rich in vitamins‚ minerals‚ and dietary fiber‚ promoting overall health and digestive well-being. They can be enjoyed as snacks‚ added to meals‚ or blended into smoothies for a quick and nutritious treat. Incorporating fresh fruits into your diet not only enhances flavor but also supports a balanced and healthy lifestyle. With their natural sweetness and versatility‚ fresh fruits are a perfect fit for anyone embracing a lactose-free diet. Vegetables are a cornerstone of a lactose-free diet‚ offering a wide variety of flavors‚ textures‚ and nutrients. They are naturally lactose-free‚ making them an excellent choice for those avoiding dairy products. Leafy greens like spinach‚ kale‚ and broccoli are rich in vitamins and minerals‚ while root vegetables such as carrots‚ sweet potatoes‚ and beets provide sustained energy. Cruciferous vegetables like cauliflower and Brussels sprouts are not only lactose-free but also packed with antioxidants. Incorporating a diverse range of vegetables into your meals ensures a balanced intake of essential nutrients. Many vegetables are versatile and can be prepared in various ways‚ from raw salads to roasted dishes‚ making them a convenient and delicious addition to any lactose-free meal plan. With their numerous health benefits and easy availability‚ vegetables are a key component of a healthy‚ lactose-free lifestyle. Proteins are essential for a balanced lactose-free diet‚ providing the building blocks for muscle growth and repair. Many protein sources are naturally free from lactose‚ making them ideal for those with dietary restrictions. Lean meats like chicken‚ turkey‚ and fish are excellent choices‚ offering high-quality protein without dairy. Eggs are another versatile and lactose-free protein option‚ rich in essential amino acids. Plant-based proteins such as beans‚ lentils‚ and tofu are also lactose-free and packed with nutrients. Additionally‚ nut butter and seeds provide convenient protein-rich snacks. For those who consume dairy‚ lactose-free milk and yogurt are available as protein sources. Incorporating a variety of these proteins ensures a well-rounded diet‚ supporting overall health and energy levels. With so many options‚ it’s easy to maintain a satisfying and nutritious lactose-free diet. Proteins are a vital component of any meal plan‚ promoting strength and vitality. Grains are a fundamental component of a balanced diet‚ offering essential nutrients like fiber‚ vitamins‚ and minerals. Many grains are naturally lactose-free‚ making them a great option for those avoiding dairy. Rice‚ both white and brown‚ is a versatile and lactose-free staple that pairs well with a variety of dishes. Quinoa‚ a complete protein‚ is another excellent choice‚ providing a robust nutritional profile. Oats are also lactose-free and can be enjoyed as oatmeal or used in baking. For those with gluten intolerance‚ gluten-free grains like millet‚ amaranth‚ and sorghum are ideal alternatives. Incorporating whole grains into your diet supports healthy digestion and sustained energy levels. With so many options available‚ grains can easily be integrated into a lactose-free meal plan‚ ensuring diversity and nutritional balance. They are a cornerstone of a well-rounded diet‚ offering both flavor and health benefits. Grains are a reliable and versatile choice for any lactose-free lifestyle. Snacks play a crucial role in maintaining energy levels throughout the day‚ especially on a lactose-free diet. Fortunately‚ there are numerous delicious and healthy snack options that are naturally free from lactose. Fresh fruits like apples‚ bananas‚ and berries are excellent choices‚ providing essential vitamins and antioxidants. Nuts and seeds‚ such as almonds‚ walnuts‚ and chia seeds‚ are not only lactose-free but also rich in healthy fats and proteins. Veggie sticks paired with hummus or guacamole make for satisfying and dairy-free snacks. For those with a sweet tooth‚ dark chocolate with at least 70% cocoa content is a great option‚ as it is typically lactose-free. Additionally‚ gluten-free crackers and lactose-free granola bars can be convenient snacks. When choosing store-bought options‚ always check the ingredient list to ensure they align with your dietary needs. These snacks are not only lactose-free but also packed with nutrients‚ making them ideal for a balanced diet. Snacking mindfully ensures sustained energy and overall well-being. Beverages are an essential part of a lactose-free diet‚ offering hydration and nutrition without dairy. Water is the most basic yet beneficial option‚ while plant-based milks like almond‚ soy‚ oat‚ and coconut milk provide creamy alternatives. Herbal teas and fruit juices are naturally lactose-free and rich in antioxidants. Coffee and black tea are also excellent choices‚ especially when consumed without dairy. For those who still prefer cow’s milk‚ lactose-free versions are available‚ ensuring they can enjoy milk without digestive discomfort. These beverages not only quench thirst but also contribute to a balanced diet by offering vitamins‚ minerals‚ and electrolytes. Many lactose-free drinks are fortified with calcium and vitamins‚ making them nutritionally comparable to dairy products. Additionally‚ there are numerous flavored and sparkling options that cater to diverse tastes. Always check labels to ensure no hidden lactose or dairy by-products are present. Incorporating these beverages ensures a refreshing and satisfying lactose-free lifestyle. Lactose-free foods promote improved digestion‚ reduce inflammation‚ and enhance nutrient absorption. They support weight management and provide a balanced nutritional profile‚ benefiting overall well-being and health effectively. A lactose-free diet significantly enhances digestive health by eliminating lactose‚ a sugar many people struggle to digest. This reduction minimizes symptoms like bloating‚ gas‚ and stomach cramps‚ common in those with lactose intolerance. By opting for lactose-free alternatives‚ individuals can enjoy dairy-based nutrition without the associated discomfort. Additionally‚ lactose-free foods often contain enzymes like lactase‚ which break down lactose‚ further aiding digestion. This makes them ideal for those with sensitive stomachs or specific dietary needs. Improved digestion also supports better nutrient absorption‚ ensuring the body benefits fully from the food consumed. Overall‚ a lactose-free approach promotes a smoother digestive process‚ reducing irritation and fostering a healthier gut environment. This is particularly beneficial for individuals with chronic digestive issues or those seeking a more comfortable eating experience. By incorporating lactose-free options‚ one can maintain a balanced diet while prioritizing digestive well-being.
Lactose-free diets often boast an enhanced nutritional profile due to the emphasis on whole‚ nutrient-dense foods. Many lactose-free alternatives‚ such as almond‚ soy‚ or oat milk‚ are fortified with essential vitamins like calcium‚ vitamin D‚ and B12‚ ensuring that dietary needs are met without dairy. Fresh fruits‚ vegetables‚ lean proteins‚ and whole grains are central to this diet‚ providing abundant vitamins‚ minerals‚ and fiber. These foods support immune function‚ energy levels‚ and overall health. Additionally‚ lactose-free diets tend to be lower in saturated fats and cholesterol compared to traditional dairy-rich diets‚ promoting heart health. The focus on diverse‚ unprocessed foods also reduces the intake of artificial additives and preservatives‚ further enhancing the diet’s nutritional quality. This balanced approach ensures that individuals following a lactose-free diet can maintain optimal nutrition while avoiding discomfort associated with lactose consumption. A lactose-free diet can help reduce inflammation in individuals who are lactose intolerant or sensitive to dairy products. Lactose intolerance often leads to digestive discomfort‚ which can trigger inflammatory responses in the body. By eliminating lactose-containing foods‚ the gut is spared from irritation‚ allowing it to heal and function more efficiently. This reduction in inflammation can lead to improved overall health‚ as chronic inflammation is linked to various conditions‚ including autoimmune diseases and digestive disorders. Additionally‚ many lactose-free foods‚ such as fruits‚ vegetables‚ and whole grains‚ are rich in antioxidants and anti-inflammatory properties‚ further supporting the body’s ability to combat inflammation. A well-planned lactose-free diet not only alleviates symptoms of lactose intolerance but also promotes long-term health and well-being by minimizing inflammation and fostering a balanced nutritional intake. This makes it a beneficial choice for those seeking to reduce inflammation and enhance their overall quality of life.
A lactose-free diet can play a significant role in weight management by promoting healthier eating habits and reducing calorie intake. Many lactose-containing products‚ such as cheese and whole milk‚ are high in calories and saturated fats‚ which can contribute to weight gain. Opting for lactose-free alternatives‚ like almond milk or low-fat dairy substitutes‚ often lowers calorie consumption without sacrificing nutrition. Additionally‚ a lactose-free diet encourages the consumption of whole‚ nutrient-dense foods such as fruits‚ vegetables‚ and lean proteins‚ which are naturally lower in calories and higher in fiber. This shift can lead to improved satiety and metabolism‚ supporting weight loss and maintenance. Furthermore‚ avoiding processed dairy products reduces exposure to added sugars and artificial ingredients‚ which are common in many traditional dairy items. By focusing on whole‚ unprocessed foods‚ a lactose-free diet aids in maintaining a healthy weight and overall well-being. This approach is particularly beneficial for those aiming to manage their weight while addressing dietary restrictions. Combining a lactose-free diet with other dietary needs‚ such as vegan‚ gluten-free‚ or low FODMAP‚ requires careful planning to ensure nutritional balance and manage specific health conditions effectively. Dairy-free and lactose-free options can help bridge these gaps‚ offering versatile and healthy alternatives. A vegan and lactose-free diet naturally aligns‚ as both exclude dairy products. This combination is ideal for those with lactose intolerance or ethical preferences. Plant-based alternatives like almond milk‚ tofu‚ and legumes provide essential nutrients. Dairy-free and lactose-free options ensure a seamless transition. This diet promotes digestion and aligns with cruelty-free values. A gluten-free and lactose-free diet is essential for individuals with celiac disease or gluten sensitivity combined with lactose intolerance. This dual approach ensures proper nutrient absorption and digestion. Gluten-free and lactose-free foods like rice‚ quinoa‚ and non-dairy milk are ideal. Carefully reading labels is crucial to avoid cross-contamination. This combined diet helps manage symptoms and enhances overall health‚ offering a balanced and sustainable lifestyle. A low FODMAP and lactose-free diet is often recommended for individuals managing irritable bowel syndrome (IBS) alongside lactose intolerance. This combined approach helps reduce digestive discomfort by eliminating both lactose and fermentable carbohydrates. Low FODMAP foods‚ such as gluten-free grains‚ certain fruits‚ and non-cruciferous vegetables‚ are ideal. Lactose-free alternatives like almond milk and lactose-free yogurt can be incorporated to maintain nutritional balance. This diet requires careful planning to ensure adequate fiber and nutrient intake. By focusing on low FODMAP‚ lactose-free options‚ individuals can alleviate symptoms like bloating and abdominal pain‚ improving overall gut health and quality of life. This dual dietary strategy is particularly beneficial for those with multiple sensitivities‚ offering a pathway to better digestion and well-being. Adopting a lactose-free lifestyle involves reading food labels carefully‚ planning meals‚ and exploring dairy-free alternatives. Cooking at home and substituting lactose-containing ingredients can make maintaining this diet easier and enjoyable. Reading food labels is essential for maintaining a lactose-free diet. Start by checking the ingredient list for terms like “milk‚” “lactose‚” or “whey‚” which indicate the presence of dairy. Look for certifications like “dairy-free” or “lactose-free” to ensure compliance. Be aware of hidden lactose sources‚ such as milk derivatives in processed foods. Pay attention to nutritional information to gauge lactose content. Understand that “low-lactose” may still contain some lactose‚ so opt for “lactose-free” options. Familiarize yourself with alternative terms like “non-dairy” or “plant-based‚” which often align with lactose-free requirements. Practice makes perfect—over time‚ you’ll become adept at identifying safe choices. Always double-check labels‚ as formulations can change. This skill is vital for avoiding unintended lactose consumption and managing dietary restrictions effectively. Effective meal planning and grocery shopping are crucial for maintaining a lactose-free diet. Start by creating a weekly meal plan‚ ensuring each meal and snack aligns with your dietary needs. Use a lactose-free food list PDF as a reference to identify safe options. Make a detailed grocery list to avoid impulsive purchases and ensure you have all necessary ingredients. When shopping‚ focus on lactose-free alternatives‚ such as plant-based milk‚ vegan cheese‚ and non-dairy yogurts. Explore new recipes and flavors to keep your diet varied and interesting. Don’t forget to check for hidden lactose in processed foods‚ even in seemingly unrelated products like bread or sauces. Staying organized and prepared will make adhering to a lactose-free diet easier and more sustainable. This structured approach helps prevent dietary slip-ups and ensures you always have delicious‚ lactose-free options on hand. Eating out on a lactose-free diet requires careful planning and communication. Begin by researching the restaurant’s menu online to identify lactose-free options. Many establishments now offer dairy-free alternatives‚ but it’s essential to confirm. Inform your server about your dietary restrictions to ensure they understand your needs. Ask questions about how dishes are prepared and whether lactose-containing ingredients are used‚ even in small amounts. Opt for grilled meats‚ fish‚ or vegetable-based dishes‚ as these are often naturally lactose-free. Salads and non-dairy desserts are also safe choices. Be cautious of sauces‚ dressings‚ and marinades‚ as they may contain hidden lactose. Using a lactose-free food list PDF can help you identify safe ingredients and make informed decisions. With preparation and clear communication‚ dining out can be both enjoyable and stress-free while maintaining your lactose-free lifestyle. Traveling while adhering to a lactose-free diet requires careful preparation and research. Start by investigating your destination to identify local restaurants and grocery stores that cater to lactose-free needs. Pack non-perishable lactose-free snacks‚ such as nuts‚ dried fruits‚ and energy bars‚ to ensure you always have options. Download a lactose-free food list PDF to guide your choices and help communicate your dietary requirements. When dining out‚ use translation cards or apps to explain your lactose intolerance to servers. Opt for hotels or accommodations with kitchen facilities to prepare meals safely. Additionally‚ familiarize yourself with local cuisine to identify naturally lactose-free dishes. By staying informed and prepared‚ you can enjoy your travels without compromising your dietary preferences. Access comprehensive guides‚ including a lactose-free food list PDF‚ to help navigate dietary choices. Online communities and mobile apps offer additional support for tracking and managing lactose-free lifestyles effectively. A lactose-free food list PDF is an essential resource for individuals transitioning to a lactose-free diet. This guide provides a comprehensive overview of foods to enjoy and avoid‚ ensuring a smooth transition. It includes detailed categories such as dairy alternatives‚ fresh fruits‚ vegetables‚ proteins‚ grains‚ snacks‚ and beverages. The PDF is designed to be user-friendly‚ offering clear and organized information for meal planning and grocery shopping. Many versions include nutritional benefits and recipe ideas to enhance your dietary experience. Additionally‚ some PDF guides offer tips for eating out and traveling while maintaining a lactose-free lifestyle. Downloading a reliable lactose-free food list PDF can serve as a go-to reference‚ helping you make informed choices and avoid potential triggers. It’s a valuable tool for both beginners and those already familiar with lactose-free diets. Online communities and forums dedicated to lactose-free diets have become invaluable resources for individuals seeking support and guidance. These platforms offer a space to share experiences‚ ask questions‚ and receive advice from others who follow a similar dietary path. Many forums host discussions on topics like meal planning‚ grocery shopping‚ and eating out while maintaining a lactose-free lifestyle. Some communities also share recipes and tips for adapting favorite dishes to suit dietary restrictions. Additionally‚ these forums often provide access to resources such as lactose-free food lists‚ product recommendations‚ and expert advice from nutritionists or healthcare professionals. Engaging with these communities can help individuals feel less isolated and more empowered to manage their dietary needs effectively. Popular platforms include Reddit’s r/LactoseFree and specialized Facebook groups focused on lactose-free living. These spaces foster connection and knowledge-sharing‚ making them indispensable for those navigating a lactose-free diet. Mobile apps designed for dietary tracking have become essential tools for individuals following a lactose-free diet. These apps allow users to monitor their food intake‚ identify lactose-containing products‚ and discover suitable alternatives. Features such as barcode scanners‚ food databases‚ and customizable meal plans make it easier to adhere to a lactose-free lifestyle. Many apps also provide detailed nutritional information‚ helping users make informed choices. Additionally‚ some platforms offer recipe suggestions tailored to lactose-free requirements‚ ensuring meals remain varied and enjoyable. Popular apps include MyFitnessPal‚ which has an extensive database of foods‚ and Yuka‚ which scans barcodes to detect allergens like lactose. These tools not only simplify the process of maintaining a lactose-free diet but also empower users to take control of their health. By leveraging technology‚ individuals can effortlessly track their progress and ensure they stay on course with their dietary goals.2.1. Dairy Alternatives
2.2. Fresh Fruits
2.3. Vegetables
2;4. Proteins
2.5. Grains
2.6. Snacks
2.7. Beverages
Health Benefits of Lactose-Free Foods
3.1. Improved Digestion
3.2. Enhanced Nutritional Profile
3.3. Reduced Inflammation
3.4. Weight Management
Special Dietary Considerations
4.1. Vegan and Lactose-Free Diets
4.2. Gluten-Free and Lactose-Free Diets
4.3. Low FODMAP and Lactose-Free Diets
Practical Tips for a Lactose-Free Lifestyle
5.1. Reading Food Labels
5.2; Meal Planning and Grocery Shopping
5.3. Eating Out on a Lactose-Free Diet
5.4. Traveling and Maintaining a Lactose-Free Diet
Resources and References
6.1. Lactose-Free Food List PDF
6.2. Online Communities and Forums
6.3. Mobile Apps for Tracking